React-Router
리액트는 싱글 페이지 어플리케이션이다 싱글 어플리케이션과 멀티 어플리케이션 차이는 말 그대로 하나의 페이지 어플리케이션, 여러개 페이지의 어플리케이션이다
- 싱글 페이지: html을 한번만 받아와서 어플리케이션을 실행시키고 그 이후 필요한 데이터를 받아서 화면에 업데이트해준다
- 멀티 페이지: 사용자가 다른 페이지로 이동할 때마다 새로운 html을 받아오고 페이지를 로딩할 때 css,js등을 서버에서 받아서 브라우저에 보여준다 사용자 인터렉션이 많은 경우 서버의 사용이 늘어난다
싱글 페이지 어플리케이션은 기술적으로 하나의 페이지이지만 결과를 보면 여러 페이지로 이루어진것 같다 리액트에서는 주소에 따라 알맞은 페이지를 보여준다 이때 새로운 html을 받아오는게 아니라 브라우저의 주소값만 변경하고 기존의 웹은 유지하면서 라우팅 설정에 따라 다른 페이지를 보여주게 된다
리액트 라우터 사용하기
npm install react-router-dom를 리액트앱에서 실행하여 리액트 라우터 돔을 설치한다
BrowserRouter 태그로 전체를 덮어야 해서
index.js에 작성- Routes는 Route 태그를 묶는데 사용 Route 태그만 포함되어야한다 다른 태그가 들어가면 오류
- Route pate=”주소 경로” element={실행할 컴포넌트} 주소가 path와 일치하면 해당 컴포넌트 실행
- Link to=”붙는 주소” Link를 사용해서 주소를 조작한다

index.js에 import { BrowserRouter } from 'react-router-dom';와 <BrowserRouter>를 추가해서 사용한다
1
2
3
4
5
6
7
8
9
10
11
12
13
14
15
16
17
18
19
20
21
22
23
//App.js
import React from "react";
import { Route, Routes, Link } from 'react-router-dom';
import Home from "./components/Home";
import About from "./components/About";
import Detail from "./components/Detail";

function App () {

	return (
		<>
		<h1>app page route 위</h1>
		<Routes>
			<Route path='/' element={<Home/>}></Route>
			<Route path='/about' element={<About/>}></Route>
			<Route path='/detail' element={<Detail/>}></Route>
		</Routes>
		<h1>app page route 아래</h1>
		</>
	)

}
export default App;
npm run start를 하면 기본 주소인 /가 실행되어서 Home 컴포넌트가 보여지게 된다

1
2
3
4
5
6
7
8
9
10
11
12
13
14
//Home.js
import React from 'react';
import { Route, Routes, Link } from 'react-router-dom';

function Home() {

    return (
        <>
        <h1>홈 입니다.</h1>
        <Link to='/about' className="button"> about 이동 버튼</Link>
        </>
    )
}
export default Home;
홈에서 Link를 이용해서 주소를 변경시킬수 있다 버튼을 누르면 주소가 변경되고 Route에 의해서 컴포넌트가 변경된다
1
2
3
4
5
6
7
8
9
10
11
12
13
14
//About.js
import React from 'react';
import { Route, Routes, Link } from 'react-router-dom';
function About() {
return (
<>
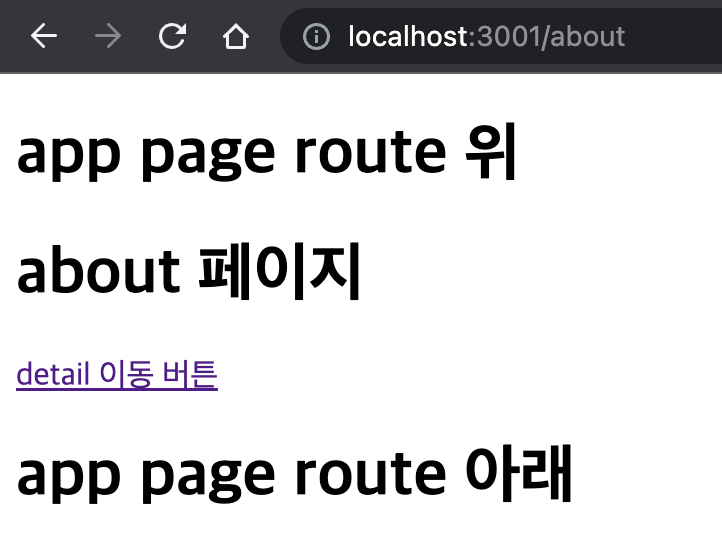
<h1>about 페이지</h1>
<Link to='/detail' className="button"> detail 이동 버튼</Link>
</>
)
}
export default About;
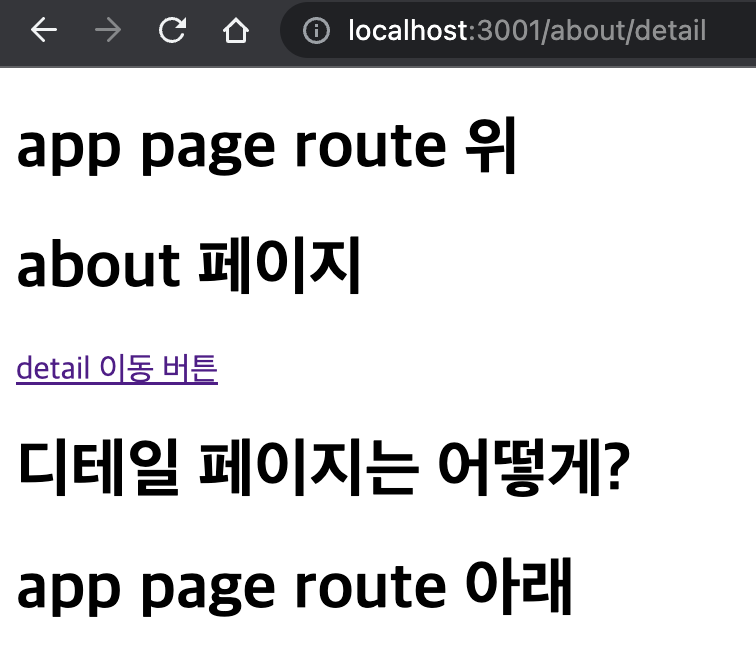
이동하면 Home컴포넌트 자리에 About 컴포넌트가 들어간다 (Route 선언 위치와 관계됨) App.js에서 작성된 위 아래 태그는 유지된다 안에 컴포넌트만 바뀐다
만약 Route컴포넌트를 중첩적으로 사용하고 싶다면 Route위치를 바꿔야한다
about 컴포넌트를 유지하면서 detail 컴포넌트를 띄우고 싶다면
1
2
3
4
5
6
7
8
9
10
11
12
13
14
15
16
17
18
19
20
21
//App.js
import React from "react";
import { Route, Routes, Link } from 'react-router-dom';
import Home from "./components/Home";
import About from "./components/About";


function App () {

	return (
		<>
		<h1>app page route 위</h1>
		<Routes>
			<Route path='/' element={<Home/>}></Route>
			<Route path='/about/*' element={<About/>}></Route>
		</Routes>
		<h1>app page route 아래</h1>
		</>
	)
}
export default App;
Route path='/about/*' *와일드 카드를 통해서 뒤에 주소가 추가로 더올 수 있다는것을 의미
1
2
3
4
5
6
7
8
9
10
11
12
13
14
15
16
17
18
//About.js
import React from 'react';
import { Route, Routes, Link } from 'react-router-dom';
import Detail from "./Detail";

function About() {

    return (
        <>
        <h1>about 페이지</h1>
        <Link to='detail' className="button"> detail 이동 버튼</Link>
        <Routes>
            <Route path='/detail' element={<Detail/>}></Route>
        </Routes>
        </>
    )
}
export default About;
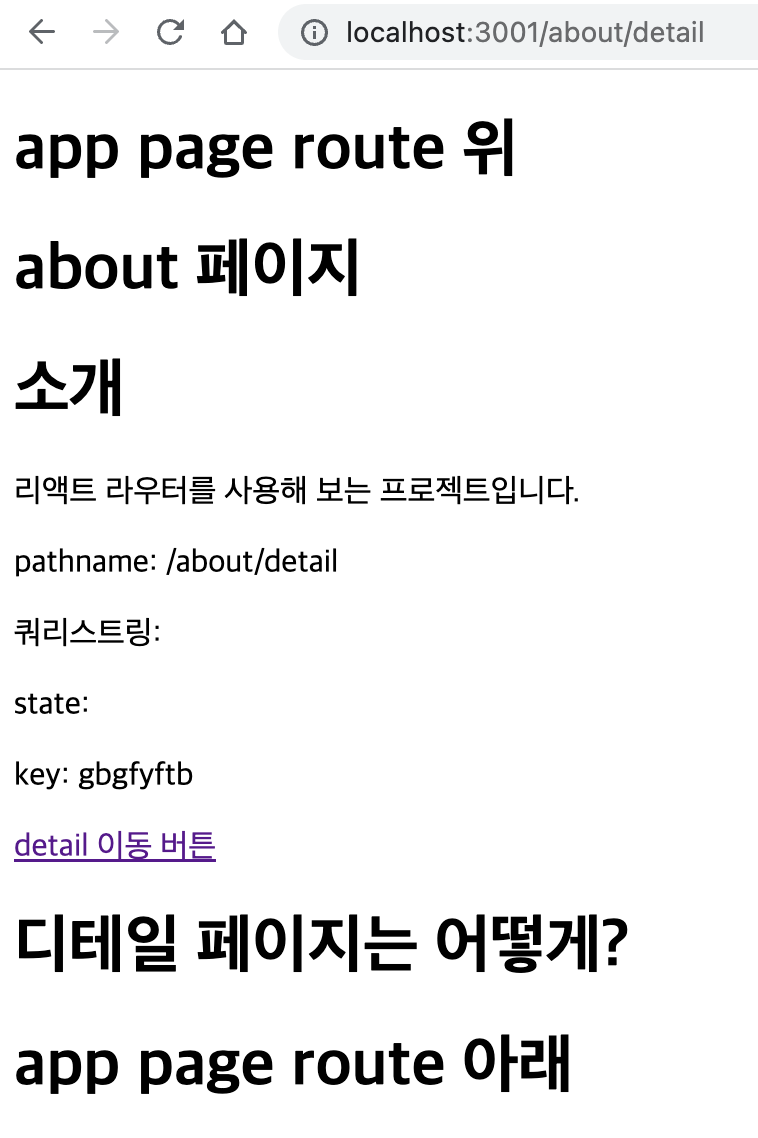
여기서 주소를 뒤에 이어서 붙이고 싶다면 Link to=""에 /를 작성하면 안된다
버튼을 누르면 about의 태그를 유지하면서 Detail 컴포넌트를 추가할 수 있다
URL 파라미터
URL파라미터는 주소 경로에 유동적인 값을 넣는것이다 주로 특정 데이터를 조회할 때 사용된다
새로운 컴포넌트를 생성
1
2
3
4
5
6
7
8
9
10
11
12
13
14
15
16
17
18
19
20
21
22
23
24
25
26
27
28
29
30
31
32
33
34
35
36
//Profile.js
import React from "react";
import { useParams } from 'react-router-dom';
const data ={
a: {
name:"민정",
number:1
},
b: {
name:"철수",
number:2
}
}
function Profile() {
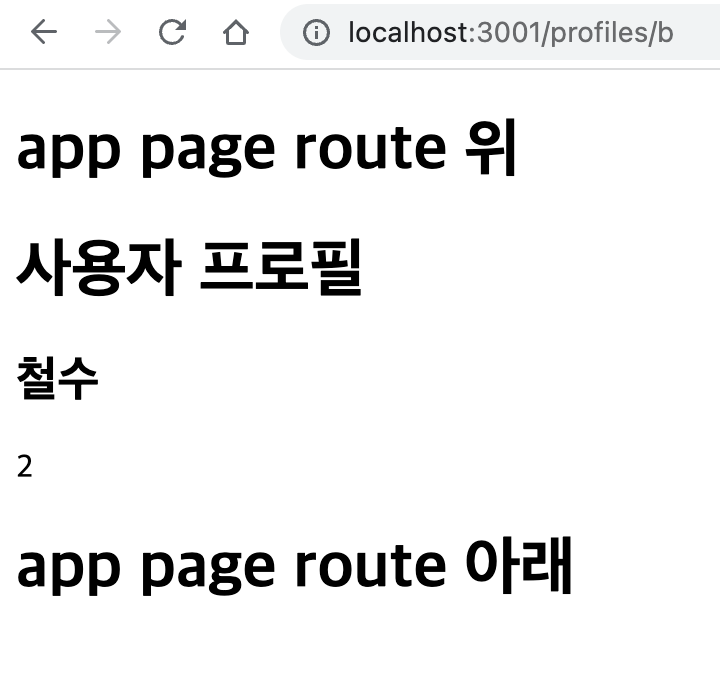
const params = useParams();
const profile = data[params.username];
return (
<div>
<h1>사용자 프로필</h1>
{profile ? (
<div>
<h2>{profile.name}</h2>
<p>{profile.number}</p>
</div>
) : (
<p>존재하지 않는 프로필입니다.</p>
)}
</div>
)
}
export default Profile;
프로파일에 값이 존재한다면 이름과 번호를 보여주고 아니라면 존재하지 않는다라고 출력한다
1
2
3
4
5
6
7
8
9
10
11
12
13
14
15
16
17
18
19
20
21
22
23
24
//App.js
import React from "react";
import { Route, Routes, Link } from 'react-router-dom';
import { useParams } from 'react-router-dom';
import Home from "./components/Home";
import About from "./components/About";
import Profile from "./components/Profile";

function App () {

	return (
		<>
		<h1>app page route 위</h1>
		<Routes>
			<Route path='/' element={<Home/>}></Route>
			<Route path='/about/*' element={<About/>}></Route>
			<Route path="/profiles/:username" element={<Profile />} />
		</Routes>
		<h1>app page route 아래</h1>
		</>
	)

}
export default App;
app.js에 /profiles/:username를 추가하고 URL파라미터는 :를 사용한다 이제 링링크를 이용해서 주소를 결정하면된다
1
2
3
4
5
6
7
8
9
10
11
12
13
14
15
16
//home.js
import React from 'react';
import { Route, Routes, Link } from 'react-router-dom';
function Home() {
return (
<>
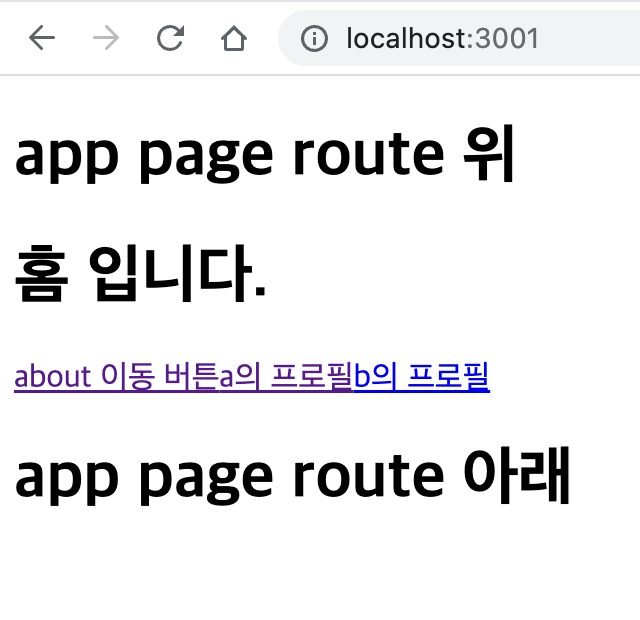
<h1>홈 입니다.</h1>
<Link to='/about' className="button"> about 이동 버튼</Link>
<Link to="/profiles/a">a의 프로필</Link>
<Link to="/profiles/b">b의 프로필</Link>
</>
)
}
export default Home;
 |  |
만약 주소경로가 올바르게 입력되지 않았다면 c입력

Profile 컴포넌트에 작성한것처럼 존재하지 않는 프로파일이라고 나온다
URL 쿼리스트링
쿼리스트링은 키워드 검색, 페이지네이션(페이지 이동), 정렬 방식등 데이터 조회에 필요한 옵션을 전달할 때 사용한다
쿼리스트링은 ?뒤에오며 key=value로 되어있다 여러개로 사용할려면 &를 사용한다
1
2
3
4
5
6
7
8
9
10
11
12
13
14
15
16
17
18
19
20
21
22
23
24
25
//About.js 변경
import React from 'react';
import { Route, Routes, Link } from 'react-router-dom';
import { useLocation } from 'react-router-dom';
import Detail from "./Detail";
function About() {
const location = useLocation();
return (
<>
<h1>about 페이지</h1>
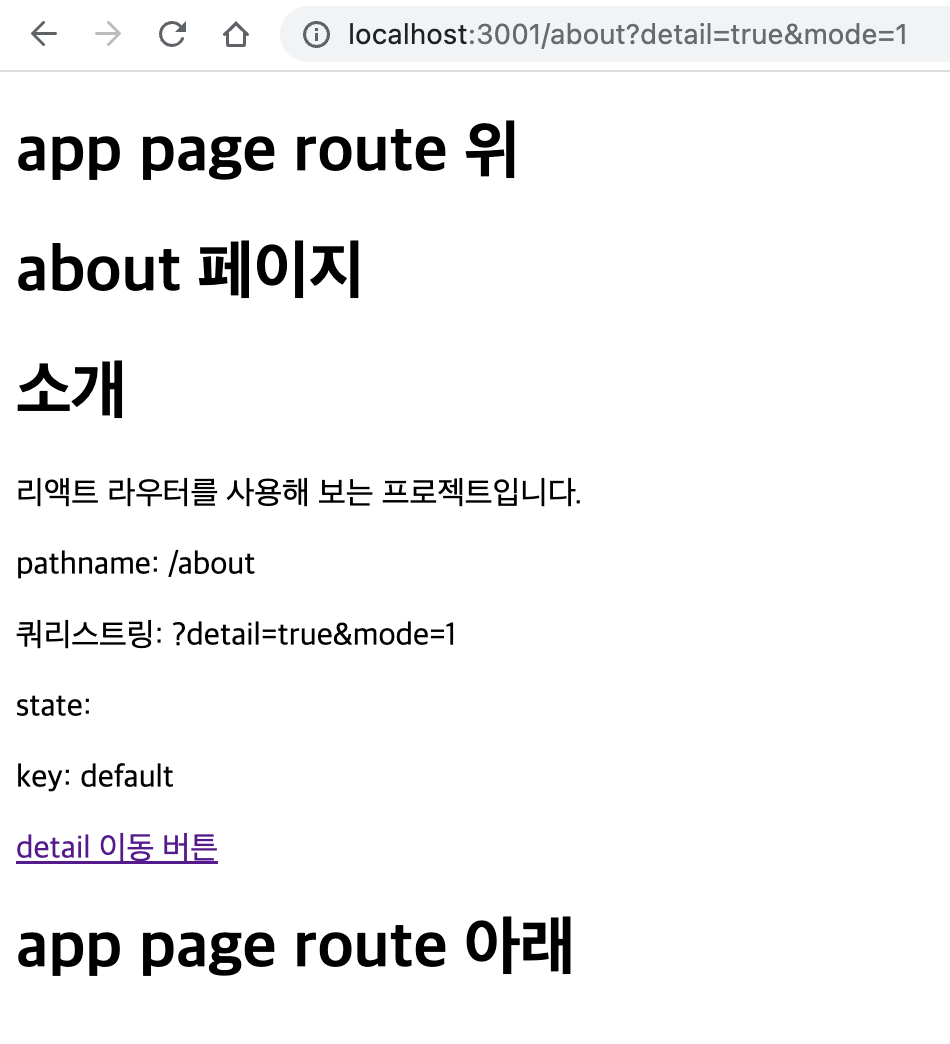
<h1>소개</h1>
<p>리액트 라우터를 사용해 보는 프로젝트입니다.</p>
<p>pathname: {location.pathname} </p>
<p>쿼리스트링: {location.search} </p>
<p>state: {location.state} </p>
<p>key: {location.key} </p>
<Link to='detail' className="button"> detail 이동 버튼</Link>
<Routes>
<Route path='/detail' element={<Detail/>}></Route>
</Routes>
</>
)
}
export default About;
useLocation은 객체를 반환하며 현재 보고있는 페이지의 정보를 가지고 있다
- pathname: 현재 주소의 경로(쿼리스트링 제외)
- search: ?를 포함한 쿼리스트링 값
- hash: 주소의 # 문자열 뒤의 값
- state: 페이지로 이동할때 임의로 넣을 수 있는 값
- key: 위에서 location 객체의 고유값 초기에는 default 페이지가 변경될때 고유값 생성
about 페이지에서 ?detail=true&mode=1를 뒤에 추가
 |  |
쿼리스트링에서 값을 가져올 때 javascript는 useSearchParams를 사용하면 쉽게 다룰 수 있다
useSearchParams는 배열을 반환하고 첫번째 원소는 쿼리파라미터를 조회하거나 수정하는 메서드들이 담긴 객체를 반환한다 get은 쿼리 파라미터 조회 만약 존재하지 않는다면 null로 조회된다 set쿼리 파라미터 업데이트
읽기 메서드
searchParams.get(key)특정 key의 value를 가져옴 2개면 제일먼저 나온 valuesearchParams.getAll(key)특정 key의 모든 value를 가져옴searchParams.toString()쿼리 스트링을 string 형태로 리턴
변경 메서드
searchParams.set(key, value)인자로 전달한 key 값을 value 로 설정, 기존에 값이 존재했다면 그 값은 삭제됨searchParams.append(key, value)기존 값을 변경하거나 삭제하지 않고 추가하는 방식
두번째 원소로 쿼리 파라미터를 객체형태로 업데이트 할 수 있는 함수 반환(쿼리 전체를 변경)
1
2
3
4
5
6
7
8
9
10
11
12
13
14
15
16
17
18
19
20
21
22
23
24
25
26
27
28
29
30
31
32
33
34
35
36
import React from 'react';
import { Route, Routes, Link } from 'react-router-dom';
import { useSearchParams } from 'react-router-dom';
import Detail from "./Detail";
function About() {
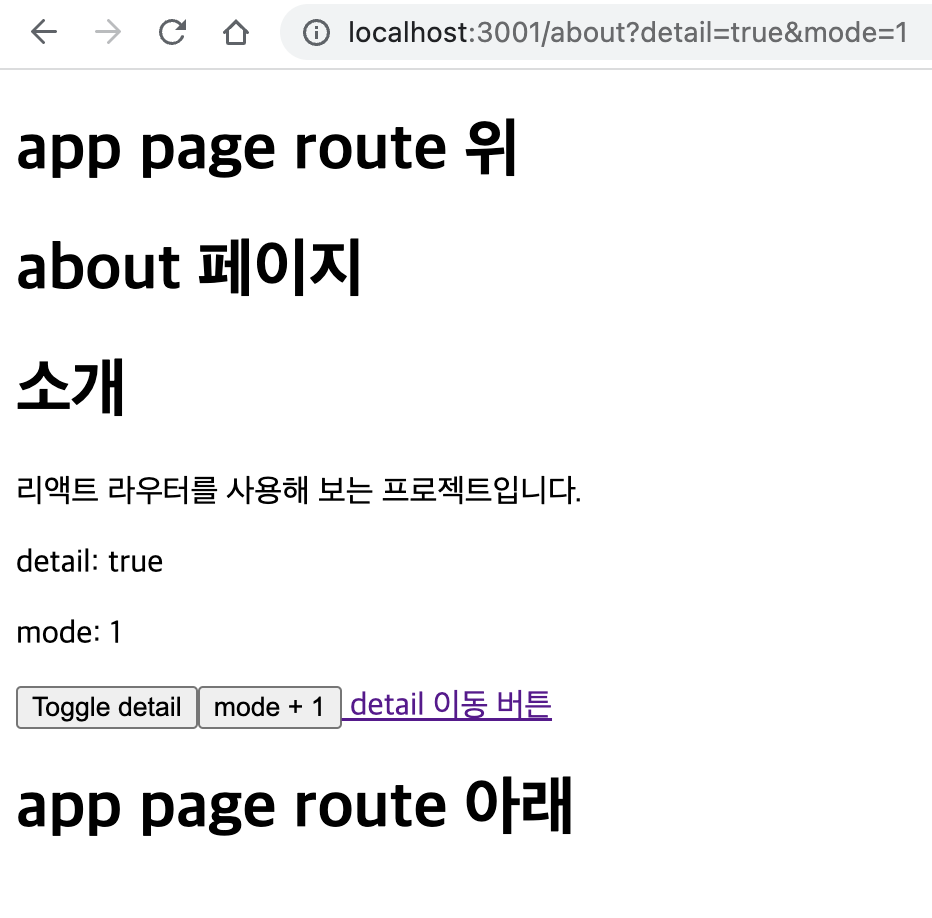
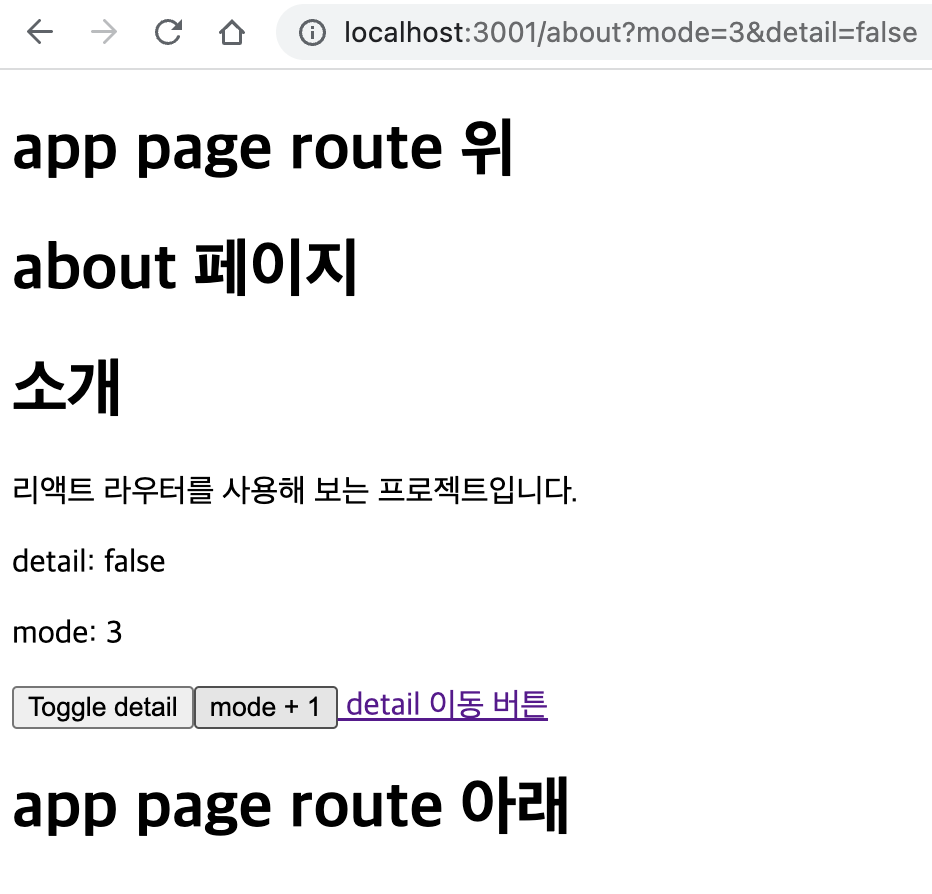
const [searchParams, setSearchParams] = useSearchParams();
const detail = searchParams.get('detail');
const mode = searchParams.get('mode');
const onToggleDetail = () => {
setSearchParams({ mode, detail: detail === 'true' ? false : true });
};
const onIncreaseMode = () => {
const nextMode = mode === null ? 1 : parseInt(mode) + 1;
setSearchParams({ mode: nextMode, detail });
};
return (
<>
<h1>about 페이지</h1>
<h1>소개</h1>
<p>리액트 라우터를 사용해 보는 프로젝트입니다.</p>
<p>detail: {detail}</p>
<p>mode: {mode}</p>
<button onClick={onToggleDetail}>Toggle detail</button>
<button onClick={onIncreaseMode}>mode + 1</button>
<Link to='detail' className="button"> detail 이동 버튼</Link>
<Routes>
<Route path='/detail' element={<Detail/>}></Route>
</Routes>
</>
)
}
export default About;
get과 setSearchParams 사용
 |  |
1
2
3
4
5
6
7
8
9
10
11
12
13
14
15
16
17
18
19
20
21
22
23
24
25
26
27
28
29
30
31
32
33
34
import React from 'react';
import { Route, Routes, Link } from 'react-router-dom';
import { useSearchParams } from 'react-router-dom';
import Detail from "./Detail";
function About() {
const [searchParams, setSearchParams] = useSearchParams();
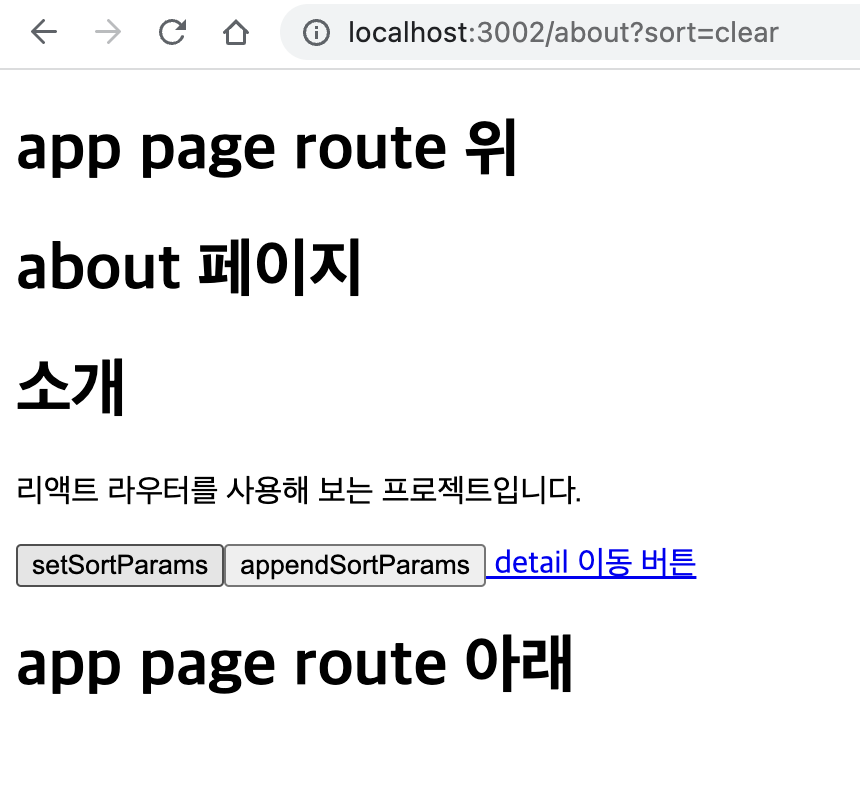
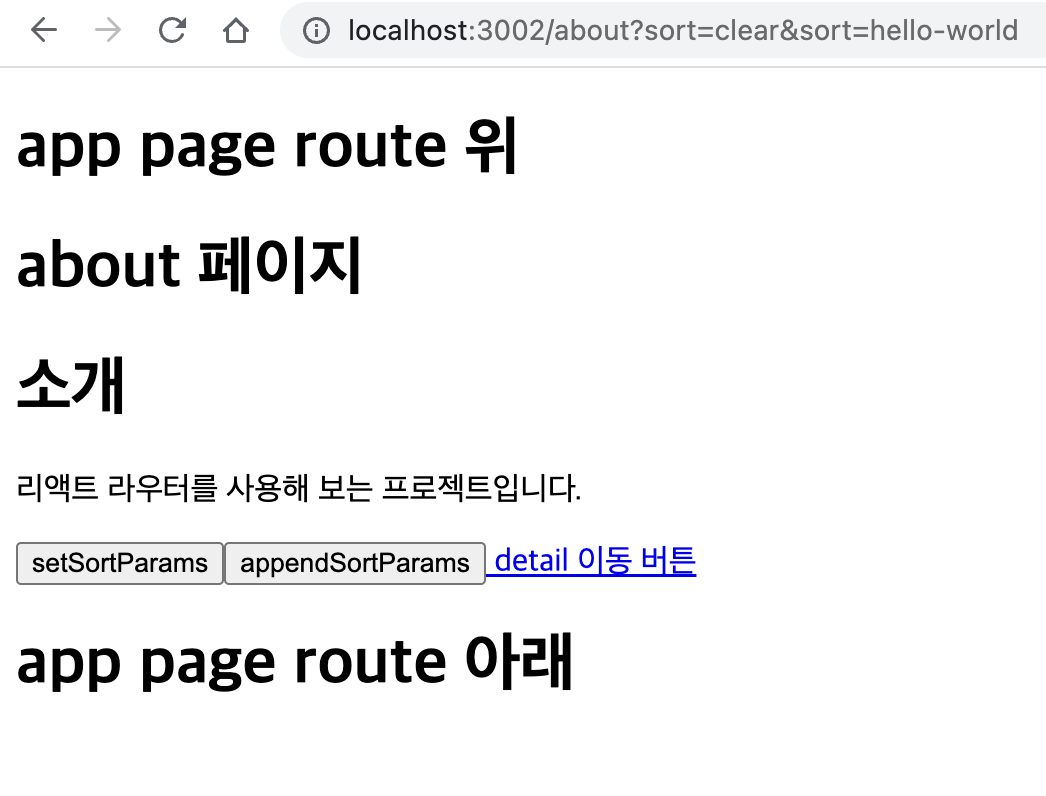
const setSortParams = () => {
searchParams.set('sort', 'clear');
setSearchParams(searchParams);
};
const appendSortParams = () => {
searchParams.append("sort", "hello-world");
setSearchParams(searchParams);
};
return (
<>
<h1>about 페이지</h1>
<h1>소개</h1>
<p>리액트 라우터를 사용해 보는 프로젝트입니다.</p>
<button onClick={setSortParams}>setSortParams</button>
<button onClick={appendSortParams}>appendSortParams</button>
<Link to='detail' className="button"> detail 이동 버튼</Link>
<Routes>
<Route path='/detail' element={<Detail/>}></Route>
</Routes>
</>
)
}
export default About;

 |  |